Physical Address
304 North Cardinal St.
Dorchester Center, MA 02124
Physical Address
304 North Cardinal St.
Dorchester Center, MA 02124
Can we talk about why every “organized” pantry on the internet looks exactly the same, and yet still feels… off? It’s an ocean of identical, clear plastic bins filled with perfectly aligned bags of quinoa. And while it’s certainly neat, it often lacks soul. It’s a cookie-cutter solution applied to a space that should be deeply personal. Your pantry is the engine of your kitchen, the behind-the-scenes support system for every meal, every gathering, every late-night snack. It deserves to be designed, not just tidied.
Can we talk about why every “organized” pantry on the internet looks exactly the same, and yet still feels… off? It’s an ocean of identical, clear plastic bins filled with perfectly aligned bags of quinoa. And while it’s certainly neat, it often lacks soul. It’s a cookie-cutter solution applied to a space that should be deeply personal. Your pantry is the engine of your kitchen, the behind-the-scenes support system for every meal, every gathering, every late-night snack. It deserves to be designed, not just tidied.
As a retail designer, I’ve spent my career creating spaces that tell a story and make products look irresistible. The secret isn’t just about arrangement; it’s about flow, lighting, and creating an emotional connection. The same principles that make you want to buy a thousand-dollar handbag can make you feel a sense of calm and control every time you open your pantry door. Forget the generic advice. This is about transforming your pantry into a beautifully functional space that reflects you and how you live. We’re moving beyond mere organization into intentional design.
Before you even think about adding to your cart, we have to do the strategic work. In luxury retail, we call this the pre-season plan. You can’t build a stunning display on a weak foundation. These first steps are everything—they separate a pantry that looks good for a week from one that works beautifully for years.
Everyone tells you to declutter. But I want you to think of this step differently. You’re not just purging; you’re editing your collection. A boutique doesn’t carry every single item available, it carries a curated selection. Your pantry should be the same. This isn’t just about tossing expired cans of beans; it’s a strategic edit of what truly serves you and your lifestyle. Be ruthless. That tin of anchovy paste you bought for a recipe two years ago and never used again? It’s visual noise.
The big lie is that this is a one-time, monumental task. It’s not. A truly well-curated space requires constant, gentle editing. The goal is to create a pantry filled only with things you actively use and love. Pull everything out, touch every single item, and ask yourself: “Do I use this? Do I even like this?” Donate what you don’t want, discard what’s expired, and you’re left with a collection that tells an honest story about how you eat. This is the first, most critical step to creating clarity.
With a clean, curated collection, you can now truly understand what you’re working with.
You know the most common mistake I see? People run out and buy a hundred dollars’ worth of matching containers before they even know what they need to store. It’s like designing a jewelry case without knowing if you’re displaying delicate rings or chunky statement necklaces. It never works. Before you buy a single bin, you must take inventory. This is your “assortment plan.” It’s the single most important step to prevent wasted money and frustration.

Once your items are purged and edited, group them. All the baking supplies together. All the pastas, all the oils, all the snacks. Now, look at them. I mean, really look at them. You might have three half-used bags of basmati rice but no flour. You might think you need small spice jars, but in reality, you buy cinnamon in bulk for your morning oatmeal. This isn’t just a list; it’s a strategic snapshot of your reality. Write it down, take a photo—this visual and written record is the blueprint for a pantry that is custom-fit to you.
Once you know what you have, you need to know where it will live.
This sounds basic, but it’s where so many people go wrong. They measure the width and depth of a shelf and call it a day. In design, precision is a luxury. We measure everything. The overall height and width, yes, but more importantly, the height between each shelf. The depth of the shelf minus the door clearance. You need to account for any pipes, outlets, or weird wall angles. Get your tape measure and measure each dimension at three different points—top, middle, and bottom—because I promise you, your walls are not perfectly straight.
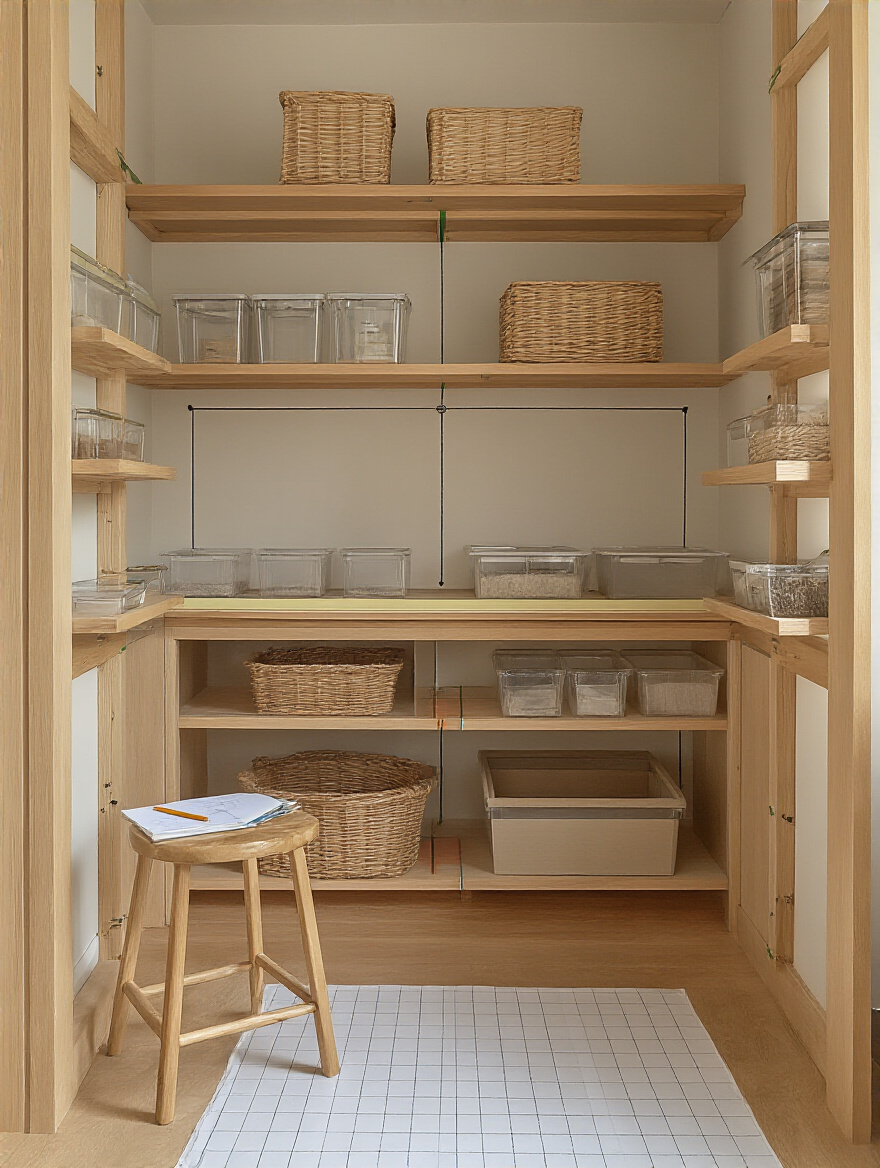
Here’s the trade secret: measure your items, too. What is the height of your tallest cereal box? The diameter of your olive oil bottle? How tall are your wine bottles if you plan to store them there? I once had a client who bought gorgeous, uniform bins, only to realize they were half an inch too tall to fit on any of her shelves. A tiny error that rendered the entire system useless. Your measurements are your architectural plan. Draw a simple sketch, and write everything down. This is the data that will inform every single purchase you make.
With your floor plan complete, it’s time to think about traffic flow.
In retail, we design for the customer’s journey. Where do they walk first? What’s the logical path from the entrance to the dressing rooms to the checkout counter? Your kitchen has a journey, too. We need to organize your pantry to support your natural workflow, not fight against it. This is about “point-of-use” storage, and it’s a game-changer. Stop thinking of your pantry as one giant storage closet and start thinking of it as a series of specialized boutiques.
Where do you make your coffee? All your coffee, tea, mugs, and sugar should live in the part of the pantry closest to that machine. Where do you prep vegetables? That’s where your oils, vinegars, and everyday spices should be. Baking supplies? Group them all together near where you use your stand mixer. By zoning your pantry based on activity, you eliminate frantic searching and unnecessary steps. The pantry becomes an intuitive partner in your cooking process, serving you exactly what you need, right where you need it.
Now that we have zones, let’s stock the shelves.
This is about creating “departments” within your zoned pantry. If your baking zone is a boutique, what are its departments? “Flours & Sugars,” “Spices & Extracts,” “Decorations & Toppings.” Creating these micro-categories makes everything incredibly easy to find and, just as importantly, to put away. It’s the difference between tossing a new bag of chocolate chips onto a random shelf versus placing it in the clearly labeled “Chocolate” bin within the “Baking” zone.
The common mistake here is being too generic. Don’t just have a “Snacks” bin if your household has completely different snacking habits. Create a “Kid’s Grab-and-Go” bin on a lower shelf and a separate “Grown-Up Snacks” bin higher up. A “Weeknight Dinners” bin with pasta, sauces, and grains can be a lifesaver. This system makes “shopping your pantry” for a meal plan a five-minute task. The more specific and intuitive your categories are, the more likely the system is to maintain itself.
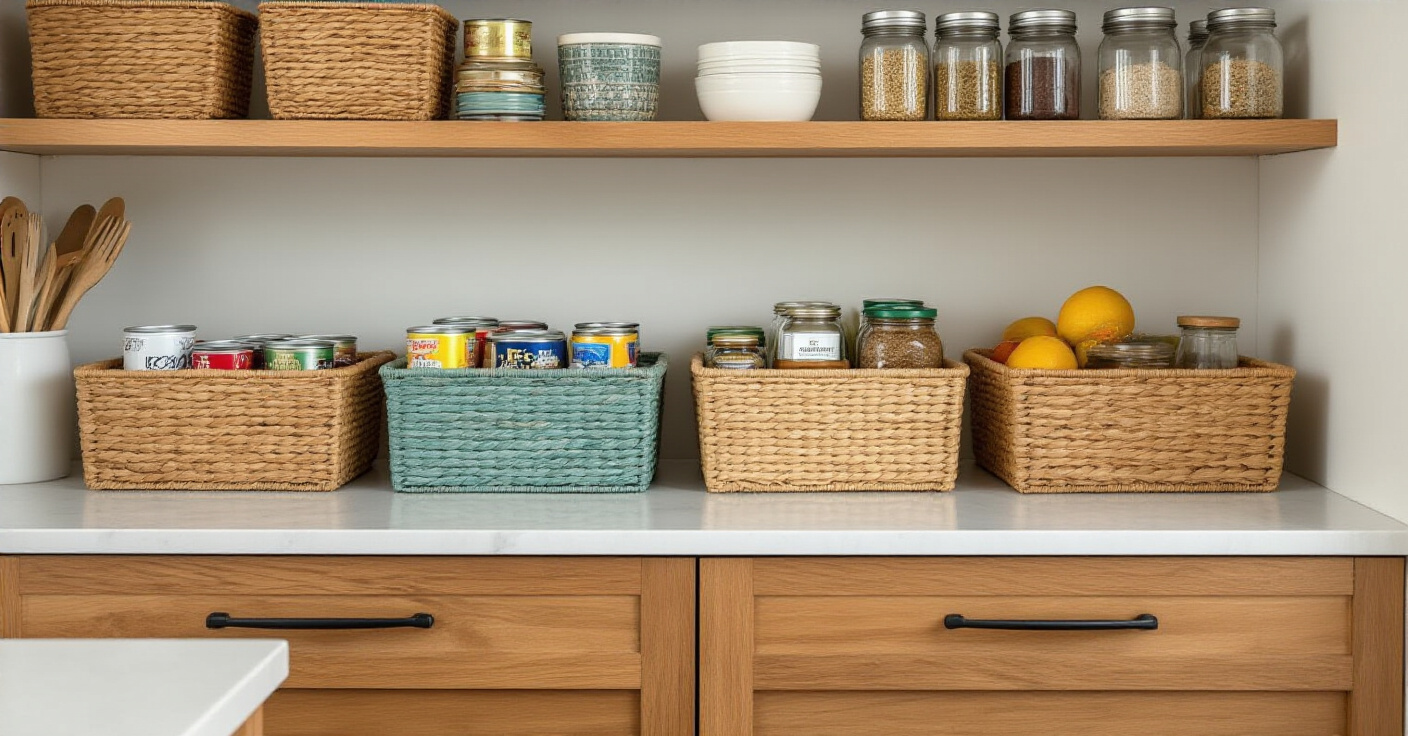
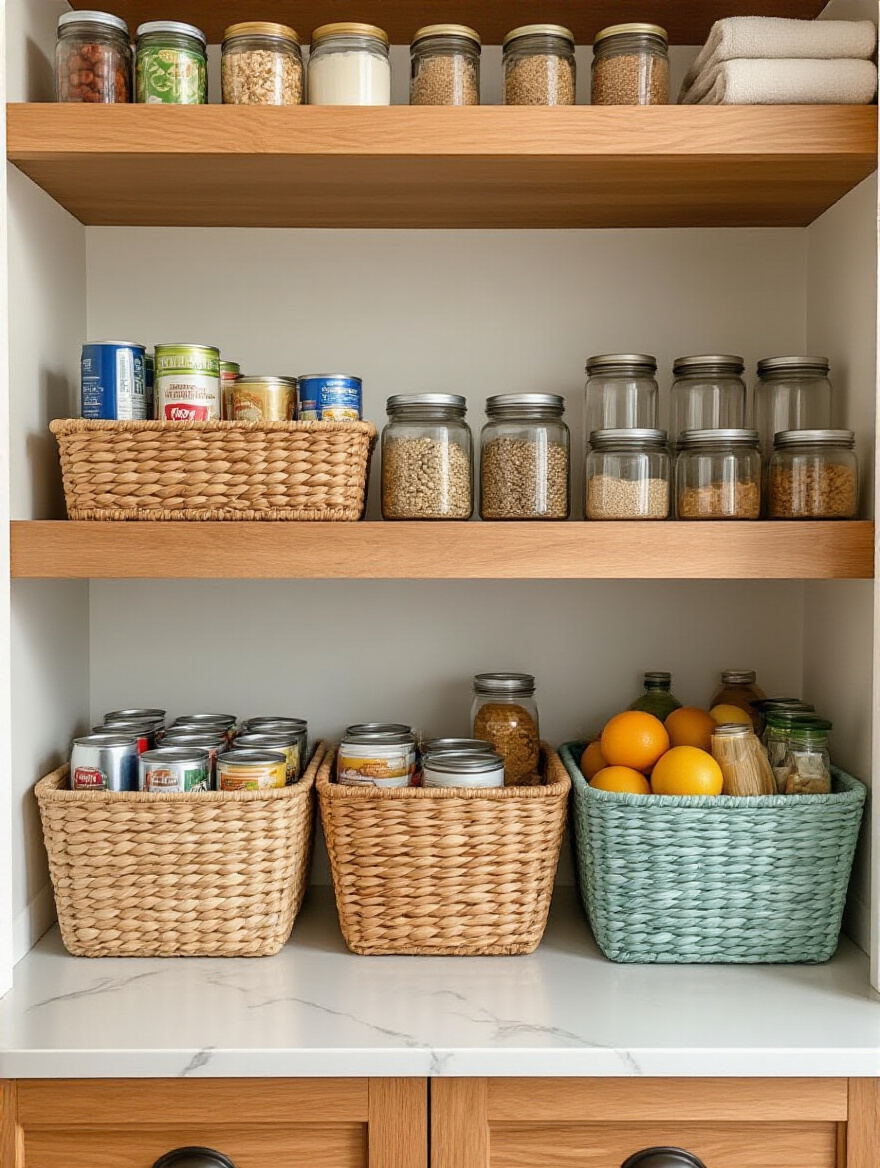
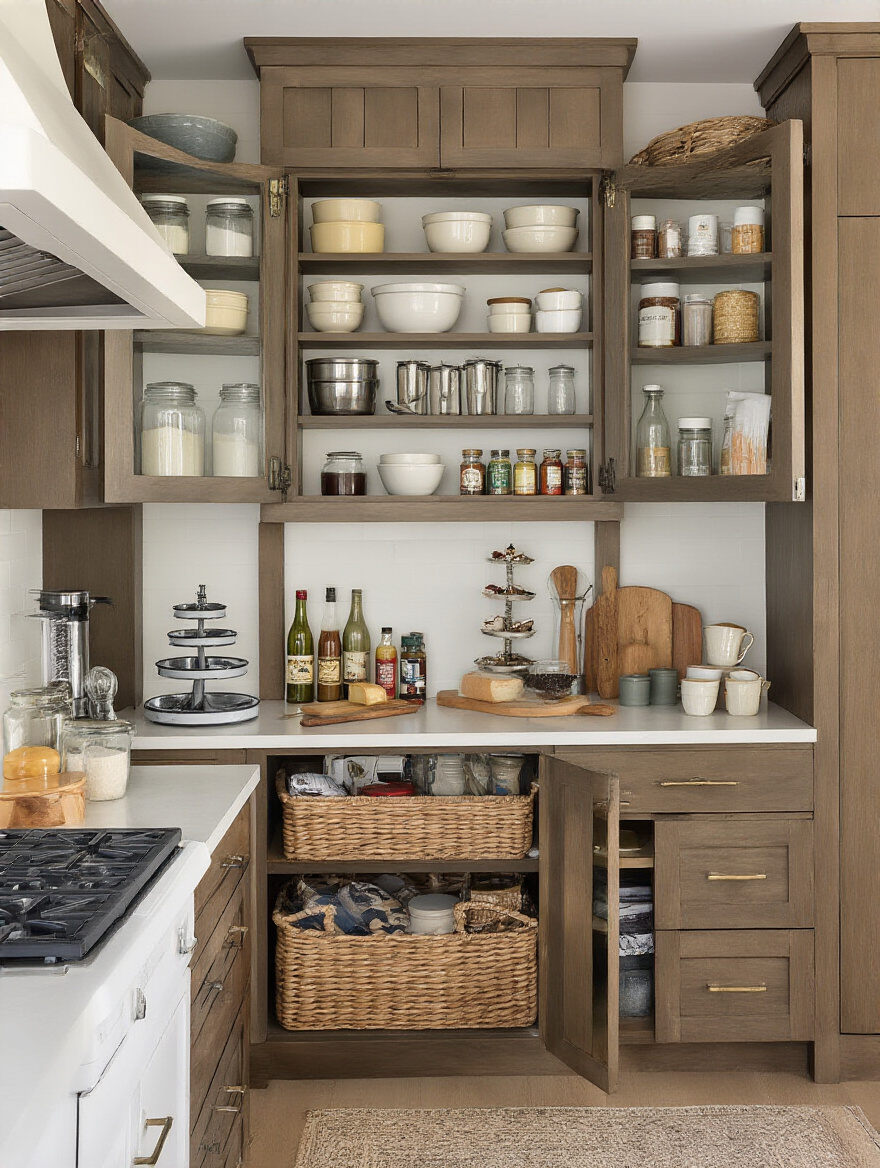
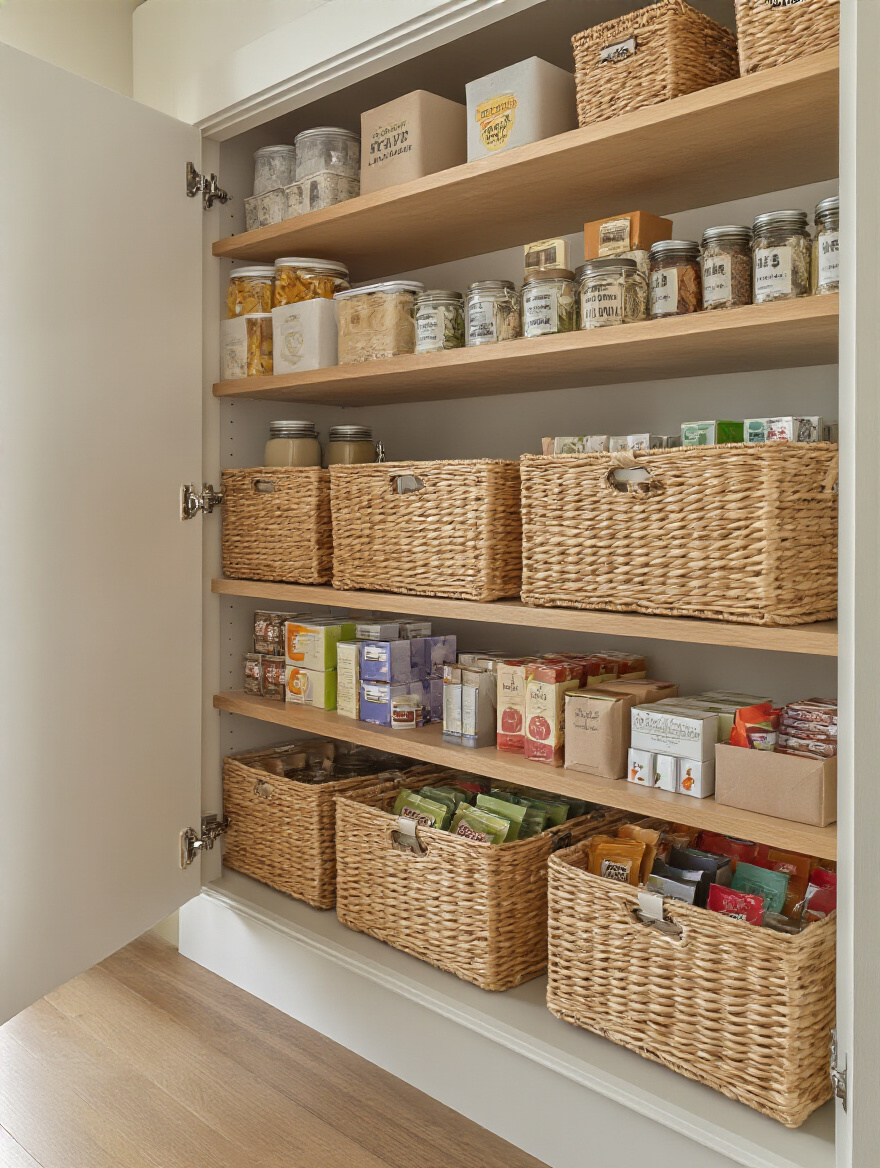
Alright, now—and only now—can we talk about the fun part: the containers. But here’s the secret: the containers are not the solution. They are the tools you use to execute the solution you’ve already designed. Choosing the right “fixtures” will bring your vision to life, creating that sense of effortless beauty and high function.
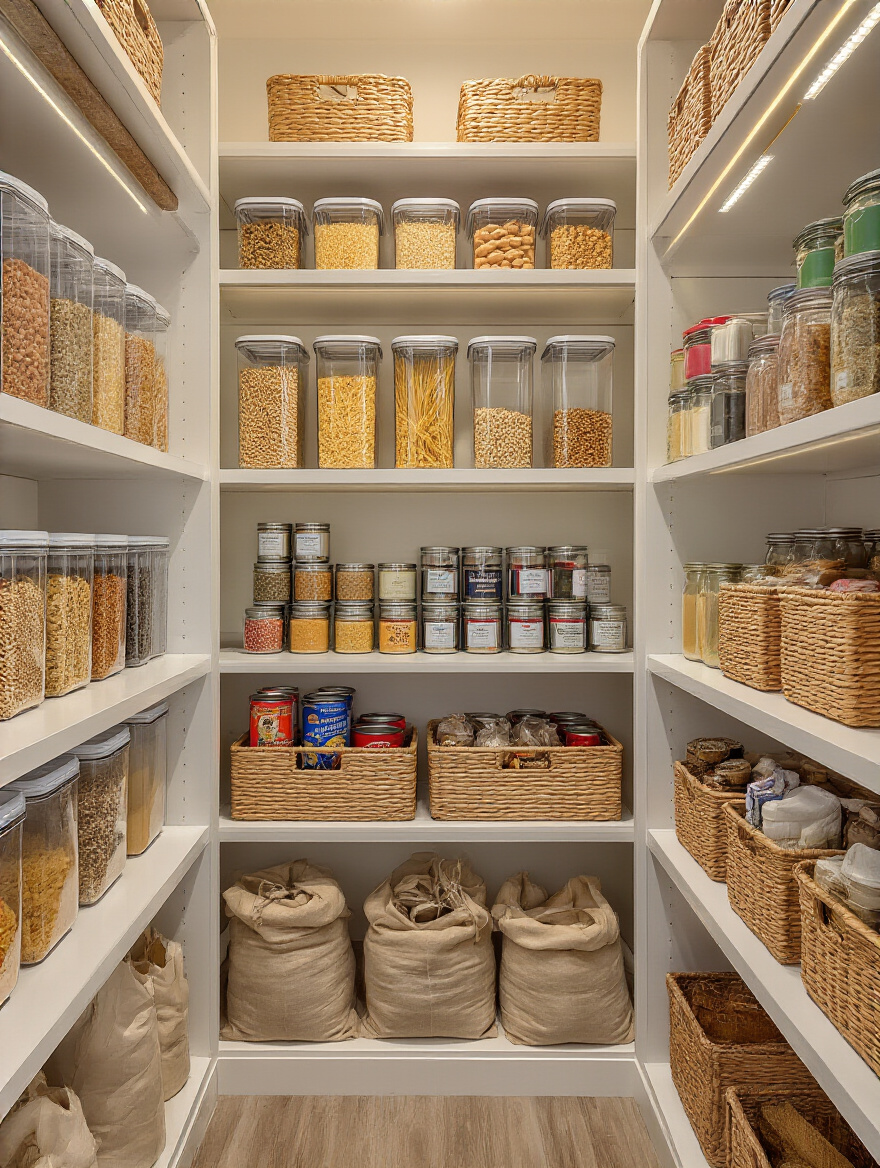
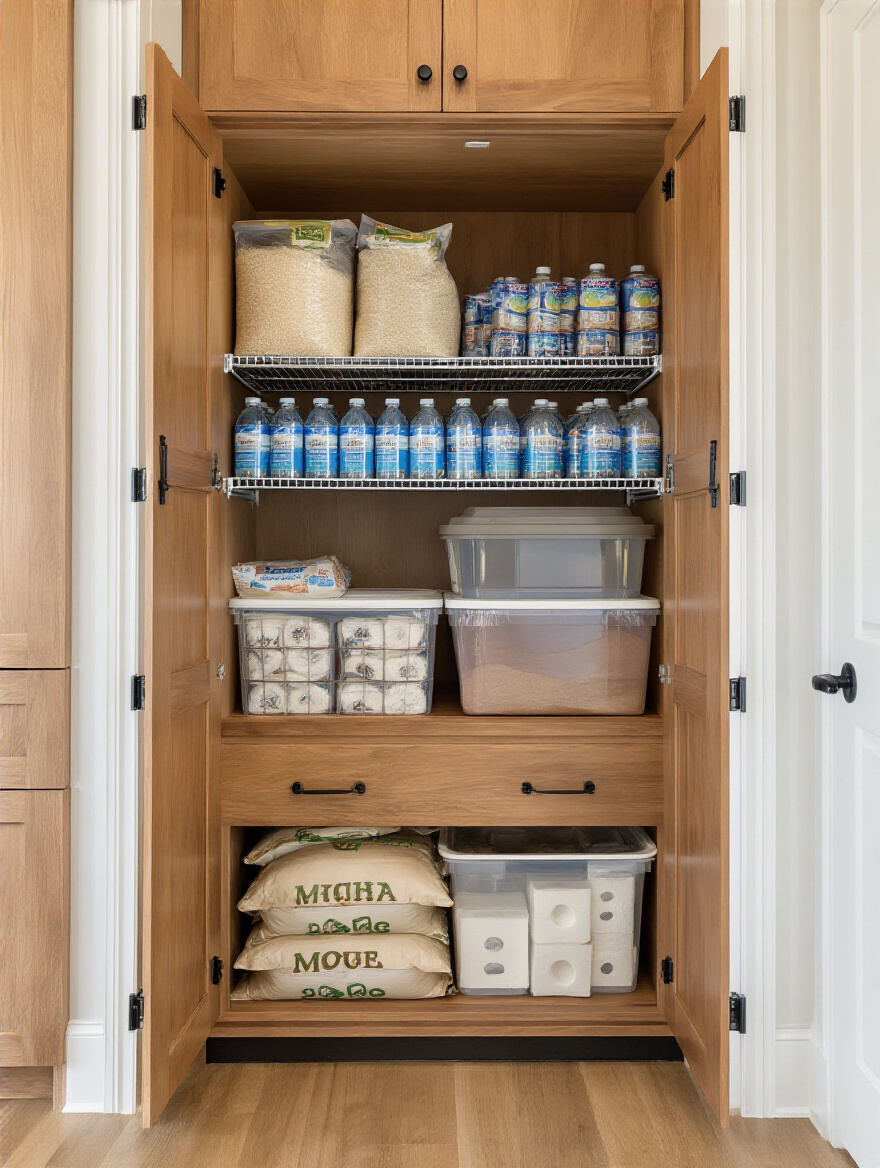
This is a non-negotiable. Storing dry goods in their original bags and boxes is not only messy, but it’s also a direct assault on the quality of your ingredients. Air, moisture, and pests are the enemy. Investing in quality airtight containers is a commitment to preserving the integrity of your food. Think of it as protecting your assets. You wouldn’t leave a silk scarf out in the sun, so don’t leave your expensive almond flour in a flimsy, half-rolled bag.
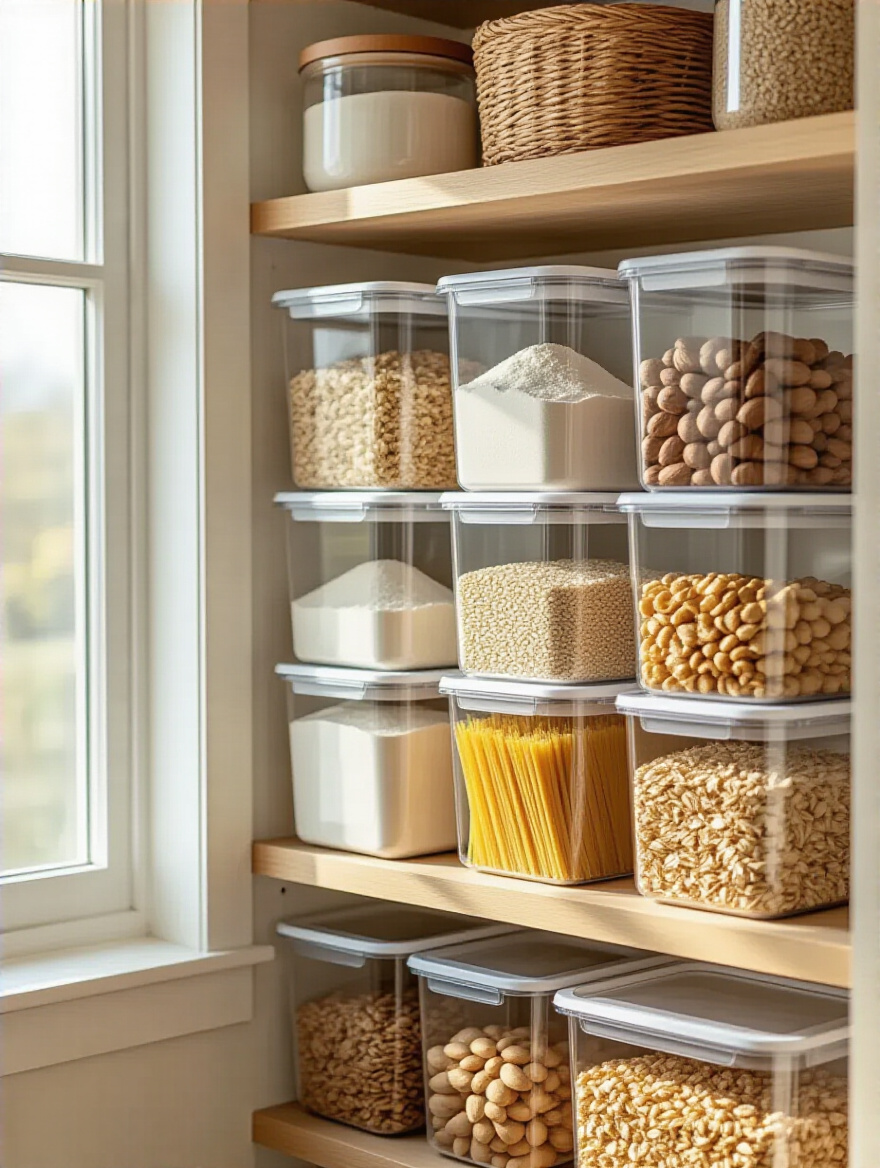
Choosing the right material is key. Glass is beautiful and inert but heavy. High-quality, BPA-free plastic like Tritan is lightweight, durable, and gives you that crystal-clear look. Don’t just buy a pre-packaged set; buy the specific sizes you need based on the inventory you just took. And please, immediately transfer everything. When you return from the store, the act of decanting becomes part of the unpacking ritual. This single habit protects your investment and ensures everything you cook with is at its absolute best.
Protected goods are great, but visible goods are even better.
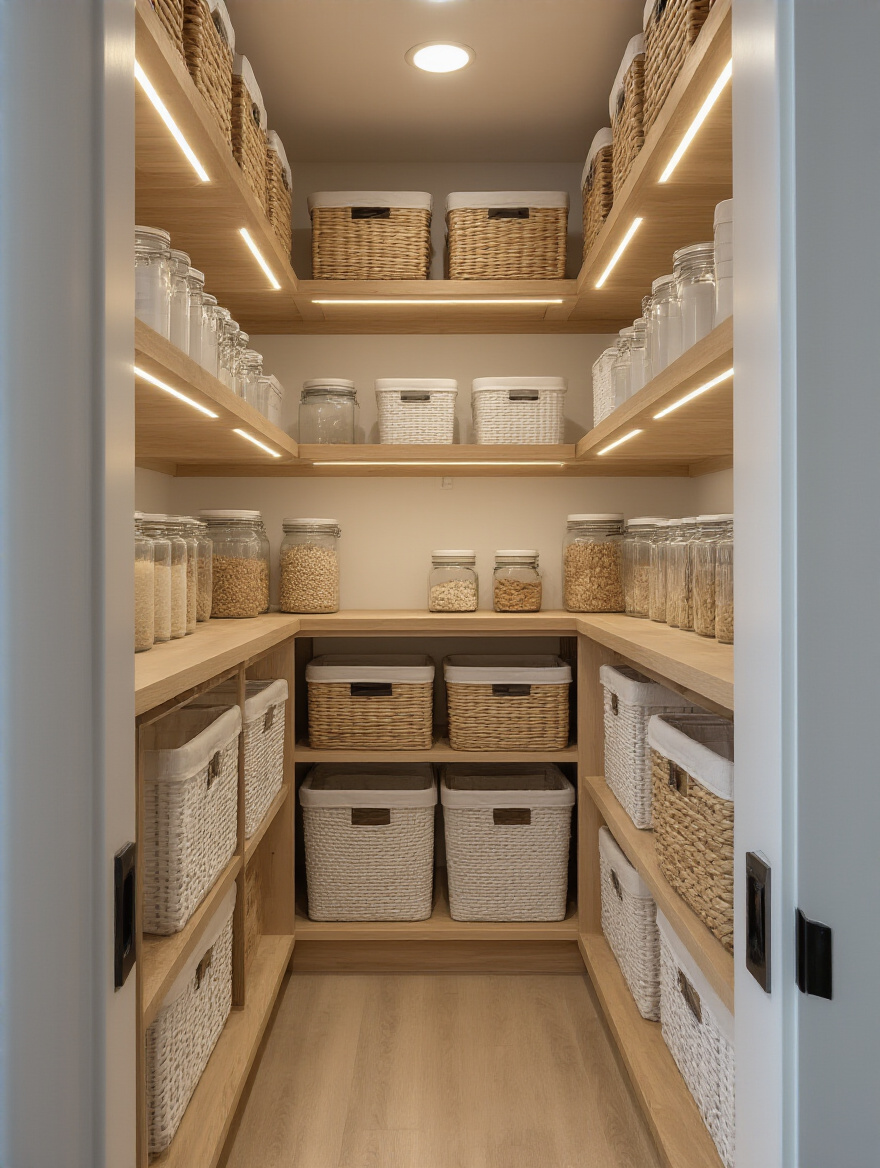
The number one rule of retail merchandising is “if they can’t see it, you can’t sell it.” The same goes for your pantry. If your oats are in an opaque ceramic jar, you will forget you have them and buy more. Using clear containers creates an instant visual inventory. At a glance, you know you’re running low on pasta or that you have more than enough brown sugar for that new cookie recipe. It’s efficiency, yes, but it’s more than that.
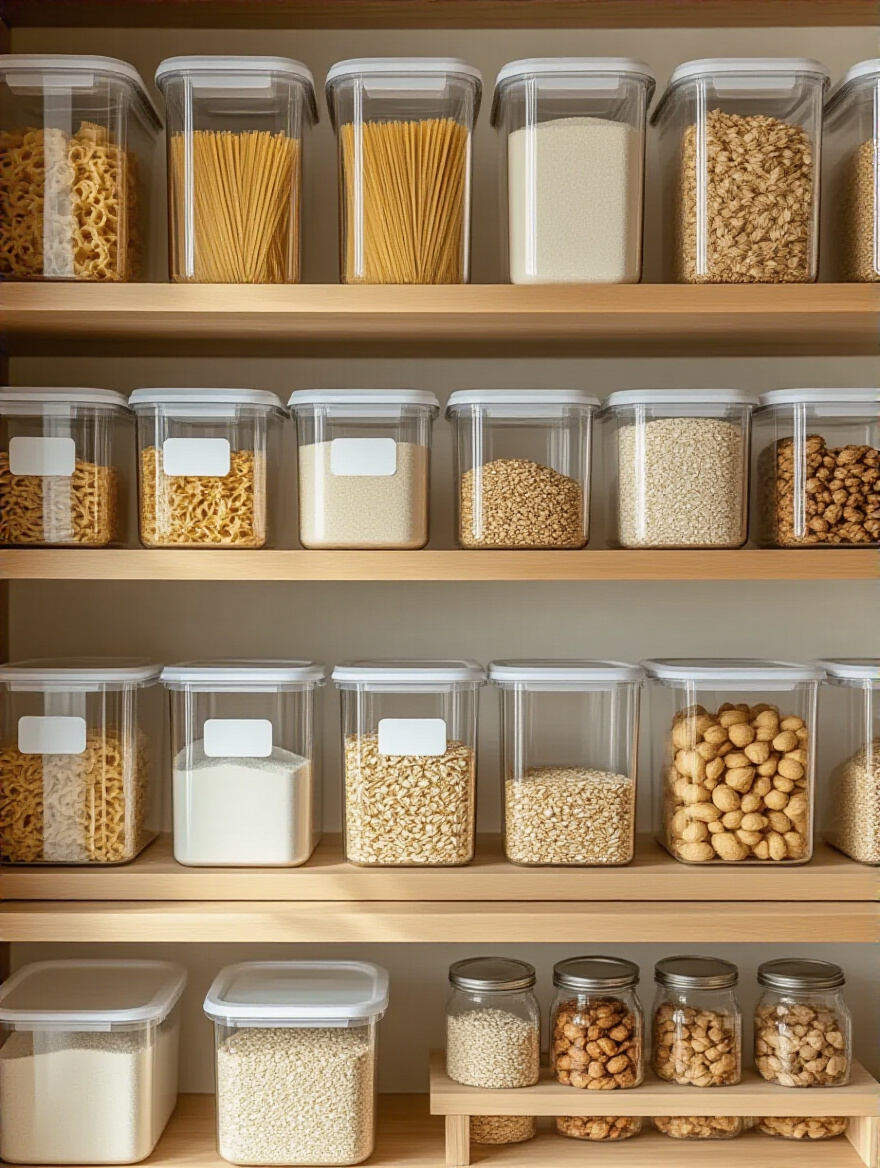
It’s about creating a sense of visual calm. Mismatched, noisy packaging creates cognitive chaos. A wall of clear containers where the food itself is the star? That’s serene. It turns your pantry from a stockroom into a beautiful display. Suddenly, humble ingredients like lentils and rice look like precious materials. It’s a simple shift that has a massive aesthetic and psychological impact every time you open the door.
With individual items beautifully housed, let’s group our collections.
While canisters are for single ingredients, bins are for grouping categories. These are your display fixtures. A bin labeled “Breakfast” can hold oatmeal packets, granola bars, and boxes of tea. A “Pasta Night” bin can hold various pasta shapes, a jar of sauce, and sun-dried tomatoes. It creates a “kit,” making meal prep ridiculously easy. You just grab the one bin.
I always recommend clear, open-front stackable bins. The clear acrylic lets you see everything inside, and the open front means you can grab what you need without unstacking the whole tower. These are perfect for creating those zones we talked about earlier. By containing loose items—bags of chips, snack pouches, juice boxes—within a bin, you create a defined boundary. Clutter happens when items don’t have a home with clear limits. Bins provide those limits, elegantly.
Now let’s tackle those awkward, lanky items that create so much visual chaos.
Nothing makes a space feel more chaotic than a teetering, messy stack of baking sheets and cutting boards. Every time you need the one at the bottom, the whole pile comes crashing down. It’s stressful and inefficient. The solution is to think vertically. Storing these flat items upright in dividers is one of the most satisfying transformations you can make.
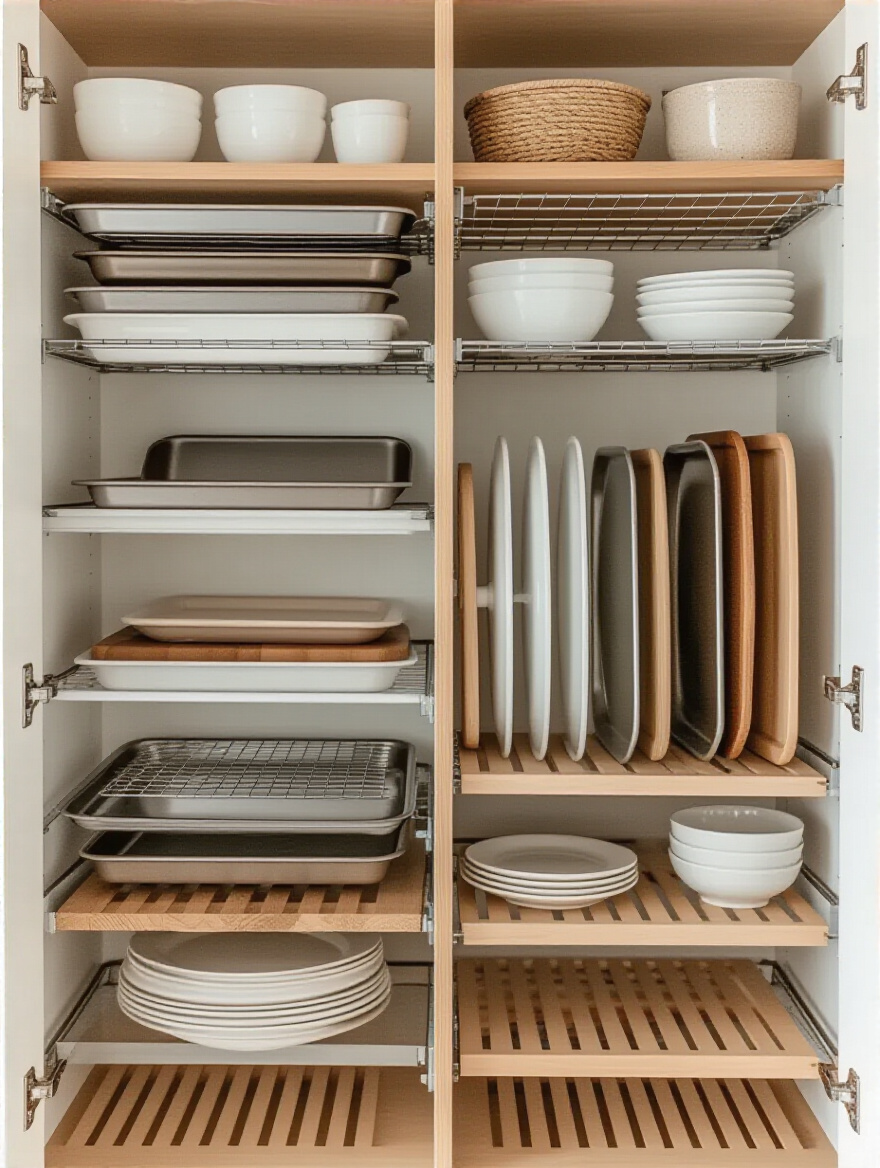
Imagine a beautiful library where every book has its own slot. That’s what vertical dividers do for your platters and pans. You can see every single one and slide it out effortlessly without disturbing anything else. I love using sturdy, adjustable metal dividers inside deep cabinets or on a low pantry shelf. It’s a simple fix that turns a jumbled mess into a beautifully organized and accessible collection, protecting your bakeware from scratches and dings in the process.
Let’s solve the deepest, darkest problem in every pantry next.
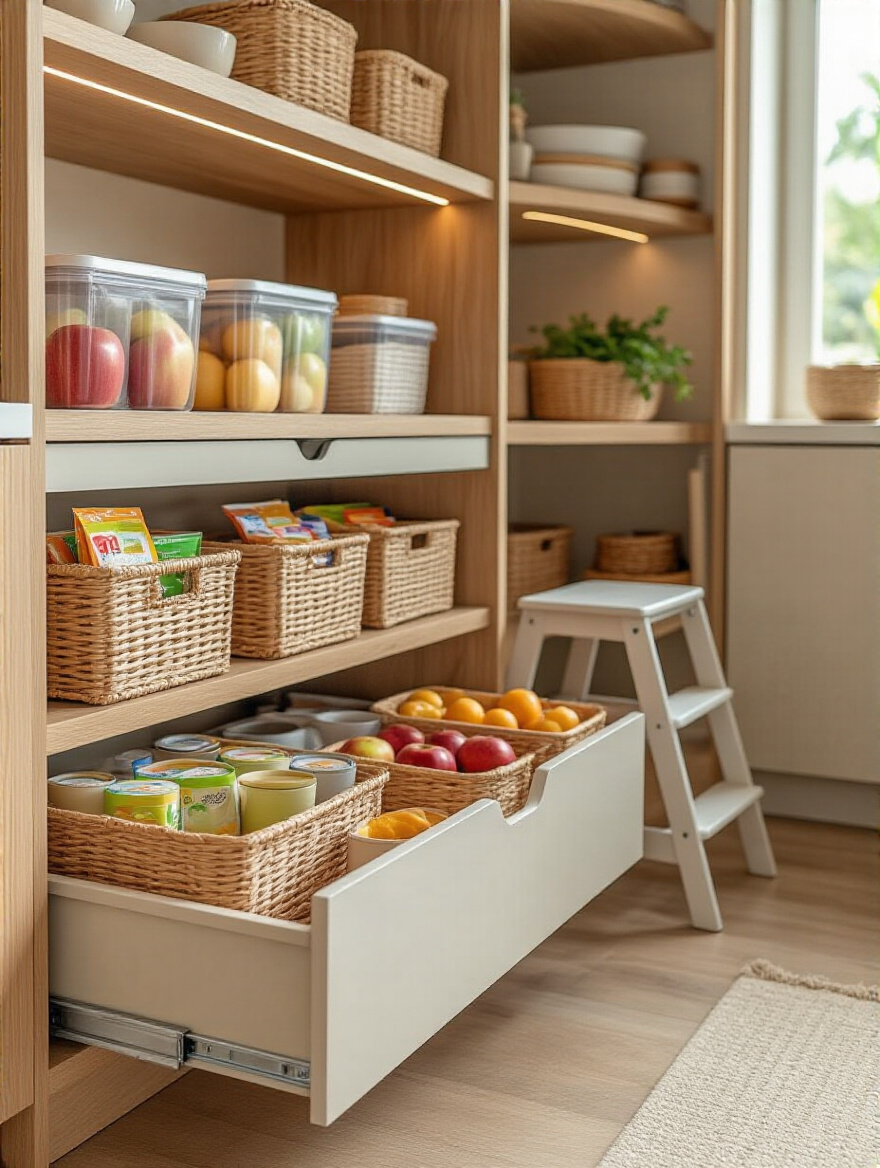
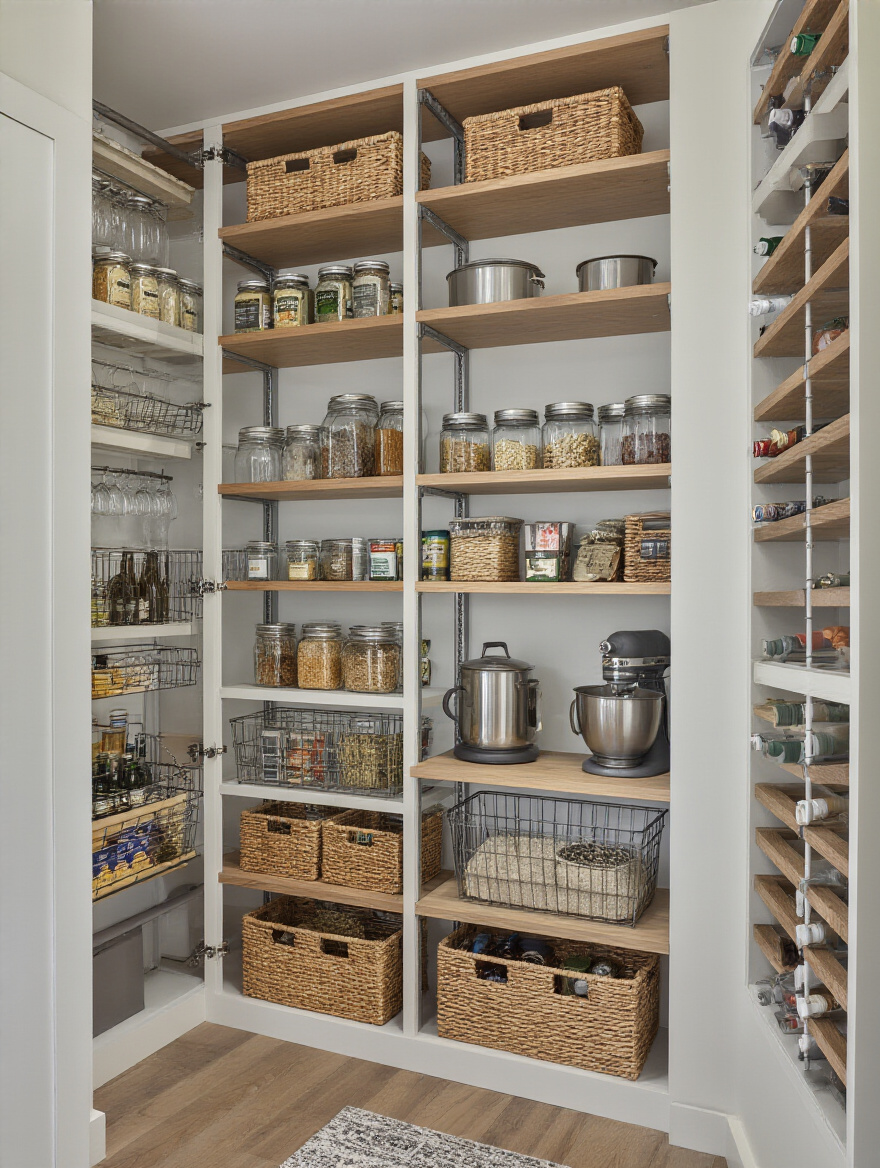
Deep pantry shelves are where good intentions go to die. Whatever gets pushed to the back is lost to time, destined to expire in the darkness. In retail, we’d never have a section of the store the customer couldn’t reach. The solution? Bring the back to the front. Pull-out drawers are the single most effective way to make every square inch of a deep pantry 100% accessible.
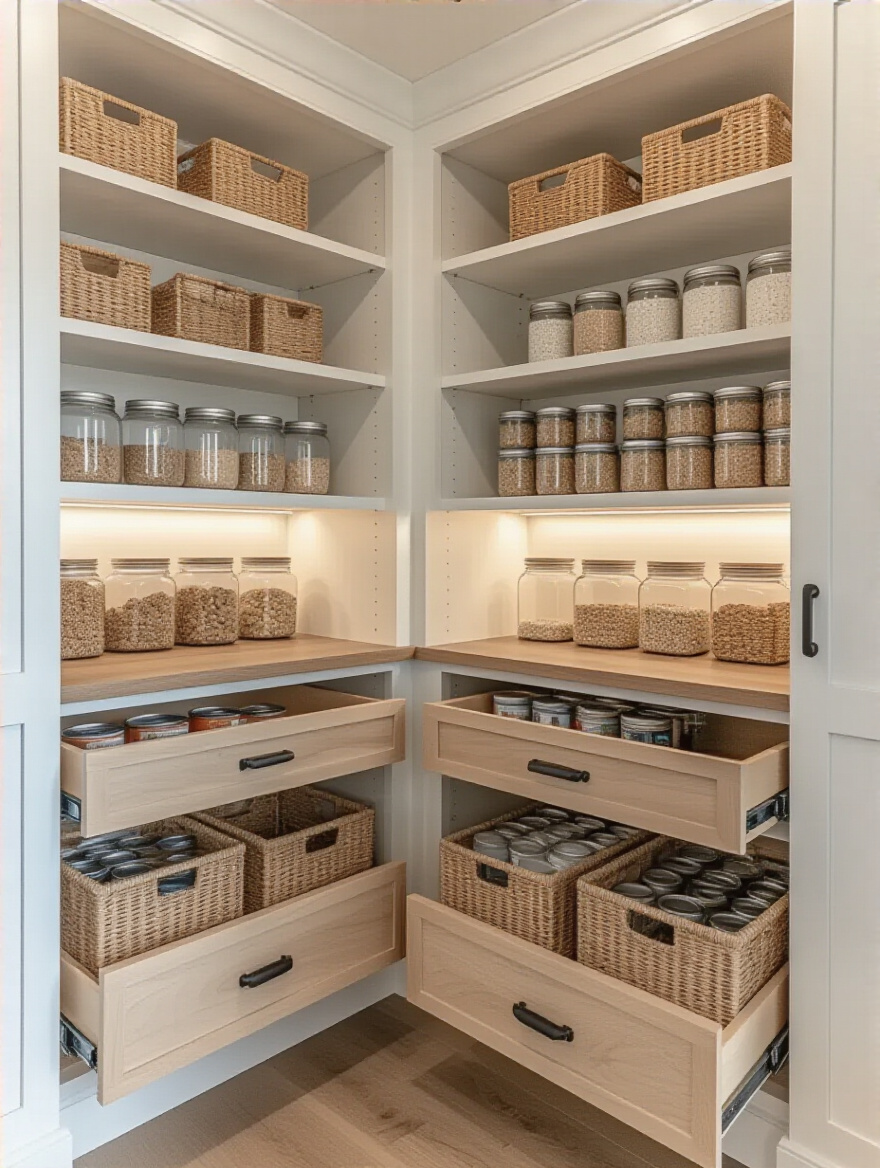
Installing pull-out shelves or drawers literally brings the contents of your pantry to you. With one smooth glide, everything from the very back is now at your fingertips. No more getting on your hands and knees with a flashlight. I recommend these especially for lower shelves where you might store heavy items like small appliances, bulk bags, or canned goods. They are an investment, but the return in terms of pure function and reduced frustration is immense.
And don’t forget the most overlooked piece of real estate in the entire kitchen.
The inside of your pantry door is prime real estate. Leaving it empty is a massive missed opportunity. It’s the perfect spot for small, lightweight, frequently used items—most notably, spices. Getting your spice collection off a precious shelf and onto the door is a brilliant space-saving move that dramatically improves function. No more spinning a lazy susan or rummaging through a drawer; every spice is lined up and ready.
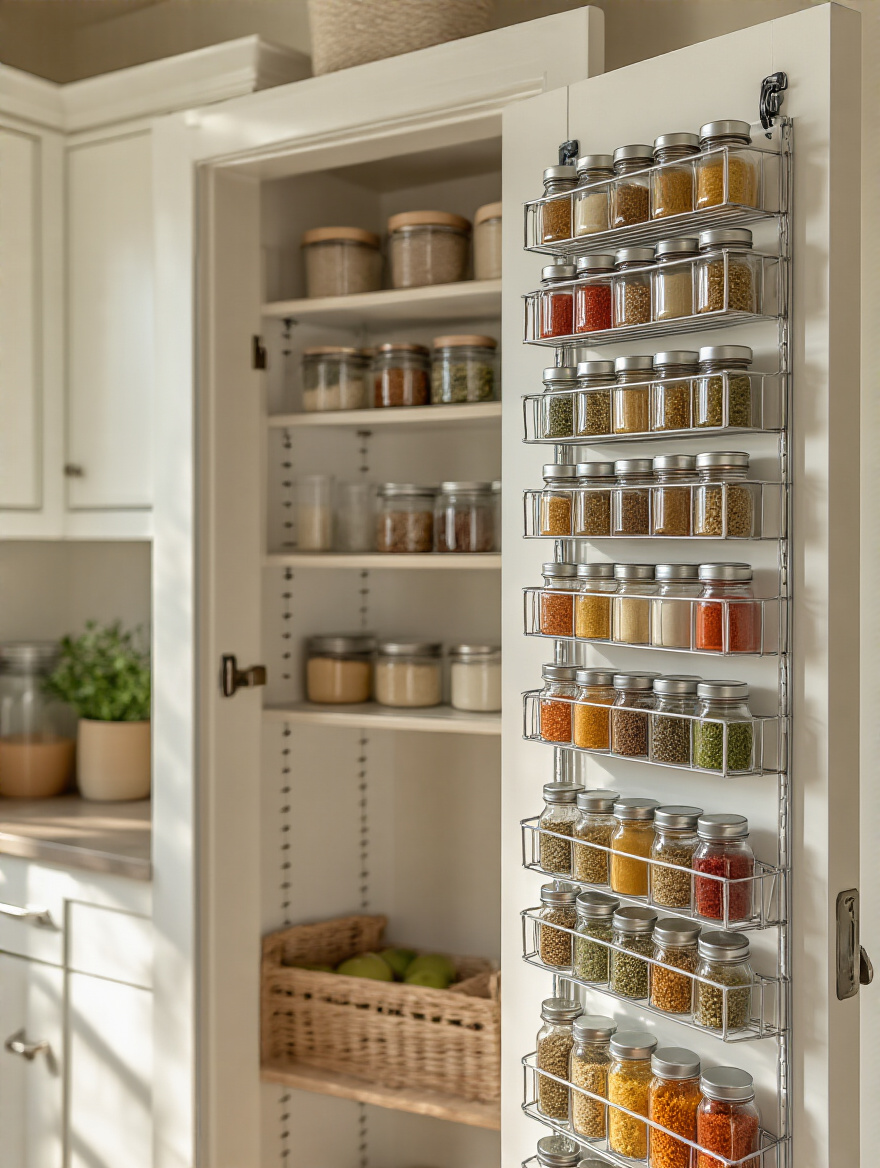
My favorite systems are sleek, wall-mounted racks that you can configure to your needs. Arrange your spices alphabetically or by cuisine type. For a truly elevated look, decant them into uniform, square glass jars. Label the front and the top of the lid. It’s a small detail that creates an incredibly professional and satisfying visual. Every time you reach for the cinnamon, it will feel like a deliberate, pleasing moment.
We’ve established the foundation and chosen our tools. Now it’s time for the styling—the pro-level tweaks that take a pantry from merely organized to truly exceptional. This is about clever composition, dynamic displays, and making the space intuitive for everyone.
Look at any high-end retail display. You’ll never see everything sitting flat on one level. We use pedestals and risers to create visual interest and maximize visibility. The same principle applies to your pantry shelves. Tiered shelf risers are the easiest way to combat wasted “air space” above shorter items like canned goods and spice jars. They literally create new levels of storage on a single shelf.
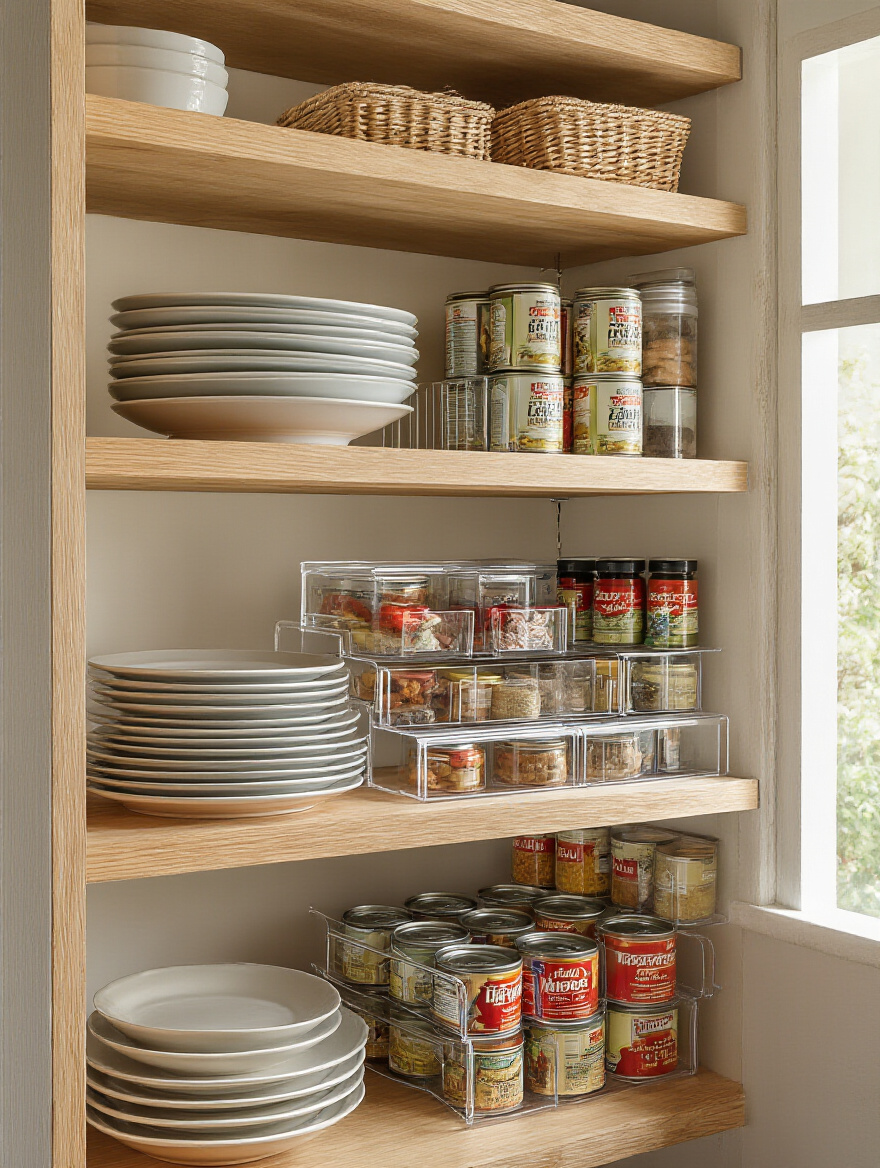
By placing a riser at the back of the shelf, you elevate the back rows, so you can see them clearly over the front row. A three-tier step riser can turn a jumbled pile of cans into an orderly, stadium-style display where every label is visible. I love clear acrylic risers because they almost disappear, letting the products themselves be the focus. Suddenly, you’re not just storing cans; you’re merchandising them.
This brings us to another retail classic for challenging spaces.
Ah, the dreaded blind corner cabinet. It’s the Bermuda Triangle of the kitchen. But what if we made it a feature instead of a flaw? A Lazy Susan, or turntable, turns that awkward, unreachable space into a dynamic, rotating display. It’s the perfect solution for storing bottles, jars, and condiments. With a simple spin, everything is front and center.
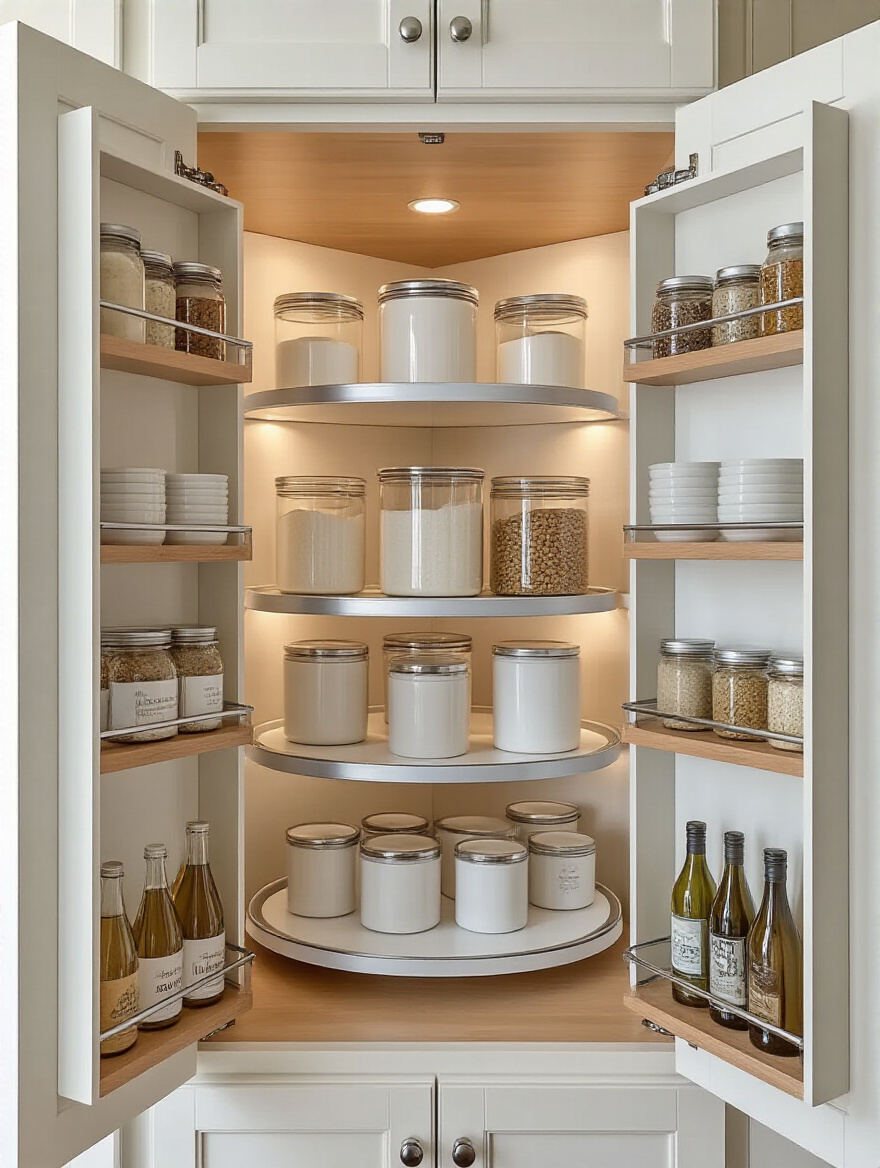
I prefer turntables with a slight lip around the edge to prevent things from flying off during a vigorous spin. Use one for all your oils and vinegars, another for jams and spreads, and another for vitamins. Grouping categories on their own turntables makes finding things a breeze. In a deep corner pantry, a multi-level Lazy Susan is a must. It transforms the most frustrating spot in your kitchen into one of the most functional and, dare I say, fun to use.
Next, let’s look up and find some hidden storage.
So much of good design is about finding and using overlooked space. The area directly underneath your pantry shelves is a perfect example. It’s typically just empty air. Simple wire under-shelf baskets that just slide on—no tools required—instantly create a new, handy storage spot. This is found space, pure and simple.
These are perfect for lightweight, awkward items that tend to clutter up main shelf surfaces. Think boxes of aluminum foil and plastic wrap, bags of bread, or even small bags of chips. By giving these items their own dedicated “floating” home, you free up prime shelf space for your beautiful canisters and bins. It’s a small, inexpensive addition that can have a surprisingly large impact on overall neatness.
With everything in its place, we need to add the final layer of communication.
In retail, signage is everything. It guides the customer, communicates information, and reinforces the brand’s aesthetic. In your pantry, labeling is your signage. It’s the final step that locks in all your hard work, eliminating any guesswork and making the system foolproof for everyone in your household. But—and this is a big but—the style of the label matters.
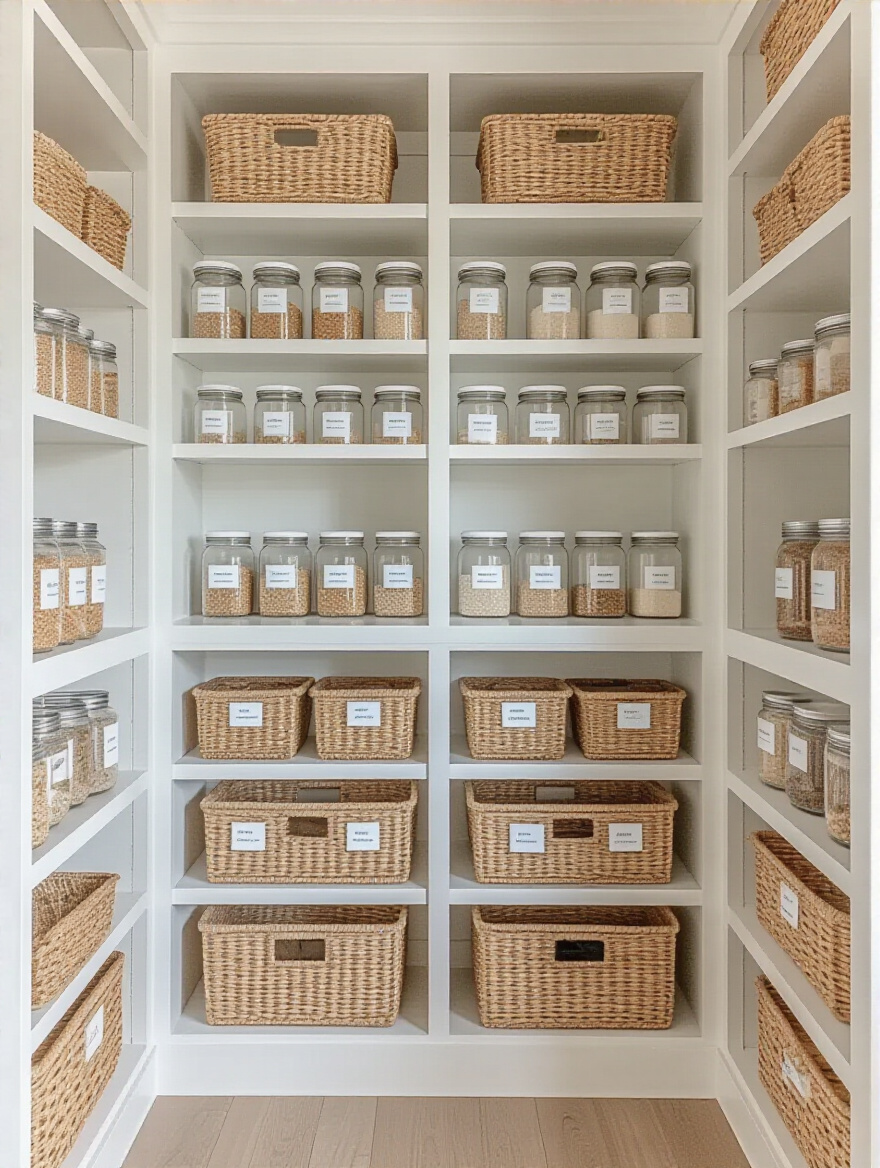
Choose one consistent labeling method and stick with it. Whether it’s a sleek, modern label from a label maker, a charming handwritten chalk label, or an elegant vinyl decal, consistency is key. A jumble of different label styles creates visual clutter. A cohesive system, on the other hand, looks intentional and high-end. Label the front of every bin and canister. It’s the instruction manual for your pantry, ensuring everything gets put back exactly where it belongs.
Good design should also be inclusive, which brings us to the littlest users of the space.
A well-designed space works for everyone who uses it. If you have children, creating a dedicated zone for them is a brilliant move for both their independence and your sanity. Designate a low, easily accessible shelf or a pull-out drawer as their snack station. This isn’t just about organization; it’s about empowering them.
Use lightweight, shatterproof containers and open-front bins that are easy for small hands to manage. Stock this area with the parent-approved snacks and drinks they can help themselves to. Use picture labels for pre-readers. This simple act can reduce the constant “Mom, can I have a snack?” chorus and teaches them responsibility for their own things. It keeps their items contained to one area, preventing the rest of your beautifully organized pantry from being disturbed.
The principle of making things more accessible is what leads us to our final aesthetic touch.
We’ve touched on this, but it deserves its own moment because it is the single most transformative aesthetic choice you can make. Decanting is the act of liberating your food from its chaotic, screaming-for-attention commercial packaging. It’s the difference between a cluttered grocery aisle and a serene, upscale food boutique. It is the final word in creating visual harmony.
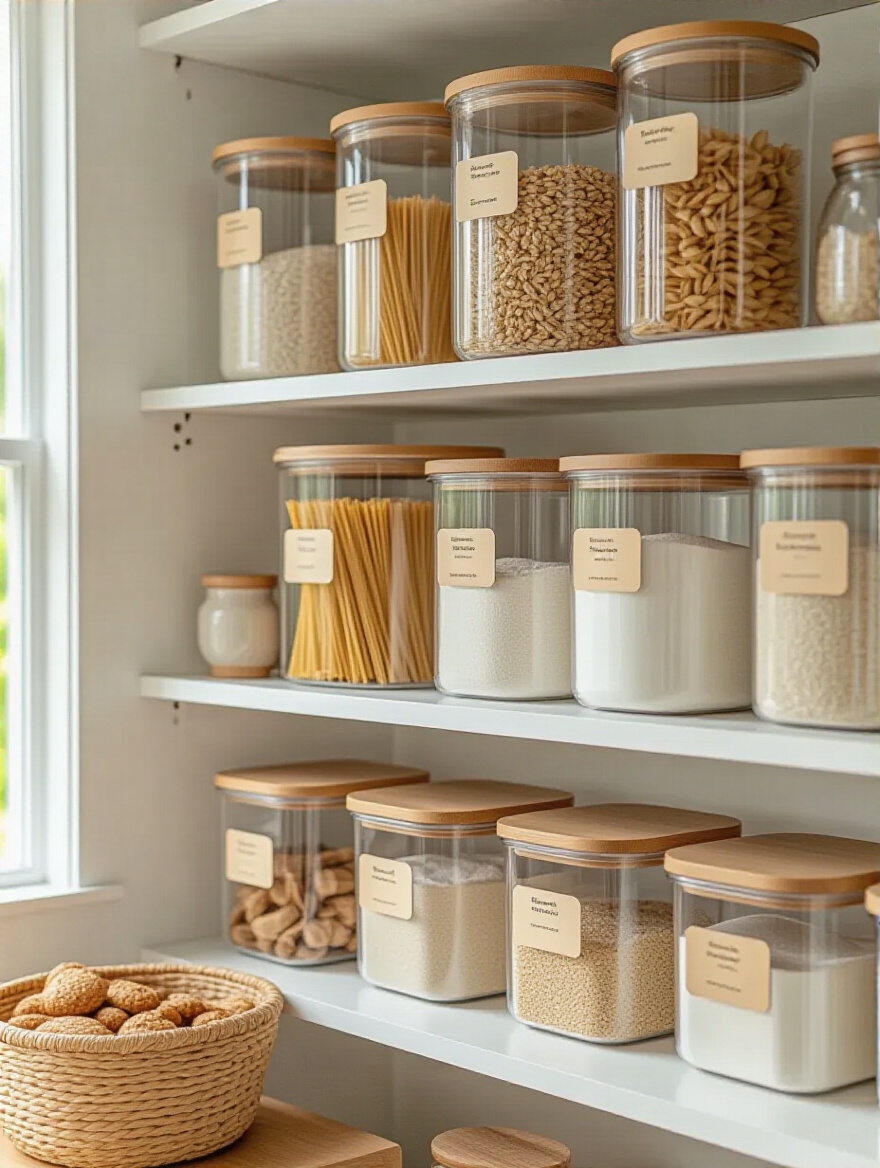
By transferring all your dry goods—flours, sugars, grains, pasta, cereals, snacks—into a cohesive set of uniform containers, you are creating a palette. The beautiful, natural colors and textures of the food become the decoration. Your pantry is no longer a billboard for a dozen different brands. Instead, it becomes a quiet, calm, and beautiful space that is a genuine pleasure to look at and use. This isn’t just for looks; the practice forces you to see and handle what you own, keeping you more in touch with your inventory.
A beautiful space is one thing, but a beautiful space that stays beautiful is the real achievement. This final phase is all about the rituals and systems that ensure your pantry remains a beacon of efficiency and calm for the long haul. A great design has to be sustainable.
This is a core principle of inventory management in any retail environment, and it’s pure gold for the home pantry. First-In, First-Out simply means you use the oldest items before you use the new ones. It sounds obvious, but without a system, it rarely happens. This is the single most effective habit for reducing food waste and saving money.

When you bring home a new jar of tomato sauce, don’t just stick it in the front. Take the 10 extra seconds to pull the older jars forward and place the new one at the back. When you decant into a container, add the new purchase to the bottom and keep the older product on top. You can use a small bin labeled “Use Me First” for items nearing their best-by date. This simple, conscious rotation turns your pantry from a passive storage space into an active, intelligent inventory system.
To make FIFO work, you need to check in regularly.
The most beautiful retail stores in the world don’t just set up a display and walk away. They are constantly tweaking, editing, and refreshing. Your pantry requires the same light-touch maintenance. I recommend scheduling a quick, 20-minute pantry review every other month. Put it on your calendar like any other important appointment. This isn’t a massive overhaul; it’s a tune-up.
During your review, you simply check for anything that’s nearing its expiration date, wipe down any sticky shelves, and make sure everything is still in its correct home. You’ll notice if a system isn’t working—for instance, if one bin is always overflowing, you might need a bigger bin or a new category. This proactive check-in prevents the pantry from slowly devolving back into chaos. It’s the secret to long-term success.
This is also the time to manage your ‘back of house.’
Buying in bulk is smart, but those giant packages of paper towels and 20-pound bags of rice can be pantry bullies, hogging all the prime real estate. A truly sophisticated system has a “stockroom” or an “overflow” area. This doesn’t have to be a huge space; it could be a shelf in the garage, a closet, or a basement storage unit. This is where your deep reserves live.
Your main kitchen pantry—your “sales floor”—should only hold what you need for the next few weeks. Keep one extra box of pasta in the pantry, and the other five in your bulk storage zone. This keeps your daily-use pantry feeling spacious, organized, and focused on immediate needs. Use heavy-duty, industrial-style shelving for these secondary zones, as they are built to handle the weight and scale of bulk items safely.
And now for the one thing everyone forgets, which is arguably the most important.
You can have the most exquisitely organized pantry in the world, but if it’s poorly lit, it will always feel dingy and second-rate. Lighting is everything in design. It dictates mood, it highlights beauty, and it is fundamentally about function. If you can’t see the label on the back of a jar, your entire organizational system is undermined. This is the single biggest upgrade you can make for the least amount of money.
Forget the single, dim overhead bulb. The goal is to Layer Your Lighting. Use motion-activated LED strip lights under each shelf to illuminate the contents below. These are incredibly easy to install and provide a wash of clean, bright light exactly where you need it, eliminating shadows. A well-lit pantry feels safer, more luxurious, and infinitely more functional. It’s a design secret that makes a space feel instantly more expensive and intentional.
Finally, let’s make sure your design can evolve with you.
Life changes. You might take up baking, go on a health kick, or start buying things in bulk. A pantry with fixed, immovable shelves is a pantry that can’t adapt. It locks you into one configuration forever. Investing in an adjustable shelving system is the ultimate way to future-proof your pantry design. It’s the difference between a custom-tailored suit and an off-the-rack one that only kind of fits.
Systems with vertical tracks and movable brackets allow you to change the height of your shelves in minutes. This means you can create tall sections for appliances, short sections for cans, and medium sections for cereal boxes, all optimized to waste as little vertical space as possible. It ensures that as your needs and habits evolve, your pantry can effortlessly evolve with you, always remaining a perfectly tailored and efficient space.
Creating a pantry that feels as beautiful as it is functional isn’t about chasing a picture-perfect ideal you saw online. It’s about applying strategic design principles to a space that is uniquely yours. It’s a process of editing your collection, understanding your personal workflow, and choosing the right tools to execute your vision. It’s about layering function with aesthetics—the practicality of pull-out drawers with the serene beauty of uniform containers, the efficiency of zoning with the transformative power of great lighting.
Your pantry has the potential to be a source of calm, control, and even delight in your home. By moving beyond simple tidying and into the realm of intentional design, you’re not just organizing cans; you’re crafting a space that supports your life, saves you time and money, and tells a story about who you are. This isn’t a one-and-done project. It’s the beginning of a new, more mindful relationship with the heart of your kitchen. And that is a luxury everyone deserves.